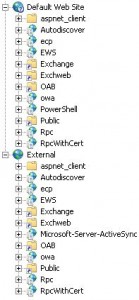
Recreate Rpc and RpcWithCert folders in IIS7
October 16th, 2012 For some reasons you might want to recreate the Rpc and RpcWithCert folders in IIS7. The reasons could be:
– Something went wrong with the old ones
– You have to use different SSL certificates, one for internal use and one for external use.
– You are using SAN SSL, certificates with trusted internal names but now this type is discontinued.
Lets make the Default Web Site the new “internal” with its own SSL for this use. Then we create a new “external”.
How is all that done?
Start with adding an additional IP to your net card.
An example, You¬†now have 192.168.10.5 and 192.168.10.6. The “internal” website should now listen on 192.168.10.5. Add a SSL cert to this one. In Exchange 2010 EMC a self signed SSL can be created. For some reason only¬†one year can be the limit.¬†Export the SSL and make a GPO to make it trusted on your clients. When trusted there will be no errors in the webmail and Outlook will work.
You can remote the local Activesync folder if you want
remove-ActiveSyncVirtualDirectory -identity “Exchange\microsoft-server-activesync (default web site)”
Remember the DNS
The internal DNS shuld point to the “internal” website/IP (192.168.10.5)
When adding the extra IP, a DNS reccord is automaticaly created on the DNS server. Remove this.
On the DNS server remove the external IP from the list of interfaces it listen on.
Then create a new website “external” and make it listen on 192.168.10.6.
Add a SSL certificate with external trust.
Now create all the sub folders in the external website with this commands:
New-OWAVirtualDirectory -Name “owa” -WebSite “External”
New-EcpVirtualDirectory -WebSiteName “External”
New-ActiveSyncVirtualDirectory -WebSiteName “External” -ExternalURL “https://externalDNSname.domain.com/Microsoft-Server-ActiveSync”
New-AutodiscoverVirtualDirectory -WebSiteName “External”
New-OABVirtualDirectory -WebSiteName “External” -recovery New-WebServicesVirtualDirectory -WebSiteName “External”
Find the IIS7 website cobfiguration file:
C:\Windows\System32\inetsrv\config\applicationHost.config
(You need to use Notepad to edit this one)
Add this in the right sections